#sims 4 gshade tutorial
Explore tagged Tumblr posts
Visit Tumblr Blog
Explore Tumblr blogs with no restrictions, modern design and the best experience.
Last Seen Tumblr Blogs


Fun Fact
Tumblr was created by web developers David Karp and Marco Arment.
Text
How to install CC
How to install Gshade
& lots of tutorials on @thefoxburyinstitute!
on one hand yes google sucks now enshitiffication yada yada but on the other hand if you can't figure how to make google work enough to get you a tutorial on how to do something in the sims im not playing tech support for you in a tiktok comment section
5 notes
·
View notes
Text
youtube
Did your GShade panel disappear in the latest update? Well I can help you recover it extremely easy! Also, showing you an easy way to switch back to DX9 if DX11 is causing perpetual loading screens, or the inability to play.
Good luck out there little lem! xx 🍋
#gshade#the sims 4 gshade#dx9#dx11#the sims 4 update#the sims 4 cc#help#tutorial#thesims4#thesims#the sims 4#maxis match#ts4#maxis match cc#maxismatch#showusyoursims#sims4cc#Youtube
26 notes
·
View notes
Text
Best tutorial to create your own Gshade !
youtube
The video is in French (Put your audio in English translation if you are English speakers)
© CREDITS : @plumbskat @plumbskaat
#gshade#gshade preset#the sims 4 gshade preset#sims 4 gshade preset#the sims 4#the sims 4 gameplay#preset#ts4 preset#s4 preset#sims 4 gameplay#ts4 gameplay#s4 gameplay#content creator#plumbskat#tutorial#youtube
7 notes
·
View notes
Note
I love your posts. I wanted to ask how do you do edit your photos. To get the , say reached level 10, like you just posted. How do you do that. Also your pictures are so lovely. So crisp. Love them.
Hi thank you so much! I answered some of it here, but I play with the highest graphics settings & also use this graphics overhaul by @hazelminesims. I use this indoor lighting mod & this (with sunblind for outdoors). I occasionally will use photoshop to change the level/contrast/lighting but tbh gshade does the heavy lifting in that department. Hope this helps! 🤎
21 notes
·
View notes
Text
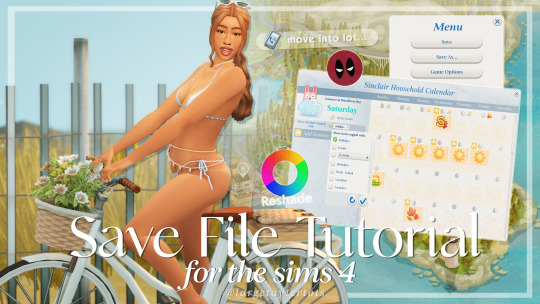
Save File Tutorial For The Sims 4 Here are my must-have steps for creating a new save file.
How To Install Custom Content/Mods
CAS Mods Stand Still in CAS by mizoreyukii More Traits in CAS by thepancake1 and mizoreyukii PreferencesPlus by helaene This mod requires 3 other mods in order to work. See the required mods at the bottom of the download post. Instant CAS Story Preferences by vicky sims More Columns in CAS by weerbesu
Map Replacement
Fanart Map Replacementsby dershayan
Mods MC Command Center by deaderpool Tags: #MCCC_Bypass or #MCCC_Include UI Cheats Extension by weebersu Phone Case Replacement by apricotrush
Calendar School Holiday Tradition by littlemssam Go Swimming Holiday Tradition by kiarasims4mods Sunbathe Holiday Tradition by kiarasims4mods Fall Fun Holiday Tradition by renegadesims Family Dinner Holiday Tradition by kiarasims4mods Winter Fun Holiday Tradition by kiarasims4mods Light Incense Holiday Tradition by littlemssam Eat Pizza Holiday Tradition by kiarasims4mods Hug Parent Holiday Tradition by kiarasims4mods Gift a Parent Holiday Tradition by kiarasims4mods More Holiday Icons by littlemssam
Lighting Mods Sunblind mod by softerhaze - (Installation Tutorial) NoBlu V2 by luumia (I use the darker version) NoGlo by luumia Reshade - (Installation Tutorial) GShade - (Installation Tutorial)
youtube / tiktok / twitch / patreon / gallery id: largetaytertots
655 notes
·
View notes
Text


nocturne - gshade preset ˗ˏˋ✩ˎˊ˗
i am finally here to release my current gshade preset. this was featured in my latest video and i got a couple questions about it. i hope you all enjoy ˖⁺‧₊˚ ♡ ˚₊‧⁺˖ if you like my fika preset, this is pretty similar. the tones are a bit different and the preset is sharper. i am obsessed. there are a couple toggles for different effect as well!
installation tutorial: How to Make The Sims 4 Look Better! (GShade Install + Tutorial/Presets/Lighting Mods)
important: i use lighting mods/terrain overrides in my game. without those there is a chance your game may look different then mine. i will link all lighting mods/terrain overrides below.
sunblind, tech-hippie terrain override, even better in game lighting mod
file location: C:\Program Files\EA Games\The Sims 4\Game\Bin\gshade-presets\Custom
tou: do not reupload and claim it as your own. do not use it as a base, tweak, it and try to claim it as your own. tweaking for personal use is completely fine. i hope you enjoy this preset. if you use it make sure to tag me so i can see.
download below the cut ౨ৎ ⋆。
download (free)
156 notes
·
View notes
Text
How to run The Sims 3 with DXVK & Reshade (Direct3D 9.0c)

Today I am going to show you guys how to install Reshade and use Direct3D 9.0c (D3D9) instead of Vulkan as rendering API.
This tutorial is based on @nornities and @desiree-uk's awesome guide on "How to use DXVK with The Sims 3", with the goal of increasing compatibility between DXVK and Reshade. For users not interested in using Reshade, you may skip this tutorial.
If you followed nornities and desiree-uk's guide, it is strongly recommended that you start from scratch, meaning you should uninstall DXVK AND Reshade completely. Believe me when I say this: it will save you a lot of time, frustration, and make your life so much easier.
For the purpose of this tutorial, I am on patch 1.69.47 and running EA App on Windows 10, but it should work for version 1.67.2 on Steam and discs, too. This tutorial does not cover GShade.
Before we start
Backup your files, even the entire folder (Program Files\EA Games\The Sims 3\Game\Bin) if you want to be extra safe; you will thank yourself later. If you do not wish to backup the entire folder, at least backup the following:
reshade-presets
reshade-shaders
Reshade.ini
Options.ini (Documents\Electronic Arts\The Sims 3)
Keep them somewhere secure, for your peace of mind (and sanity).

Done? Great stuff, let us begin!
Step 1:
If you installed DXVK following nornite and desiree-uk's guide, go to the bin folder and delete the following files to fully uninstall DXVK, we are starting from scratch:
d3d9.dll
TS3.dxvk-cache
dxvk.conf
TS3_d3d9.log (or TS3W_d3d9.log)
Step 2:
If you already have Reshade on your PC, uninstall it using this: https://reshade.me/downloads/ReShade_Setup_X.X.X.exe (replace X.X.X with version number)
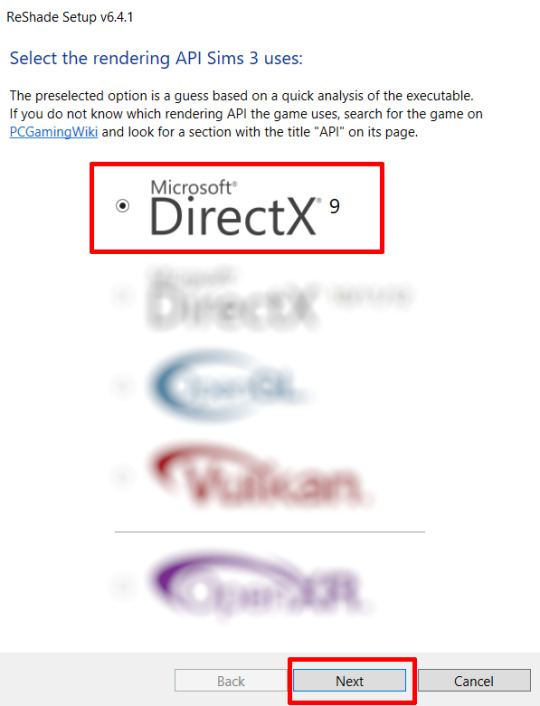
Step 3:
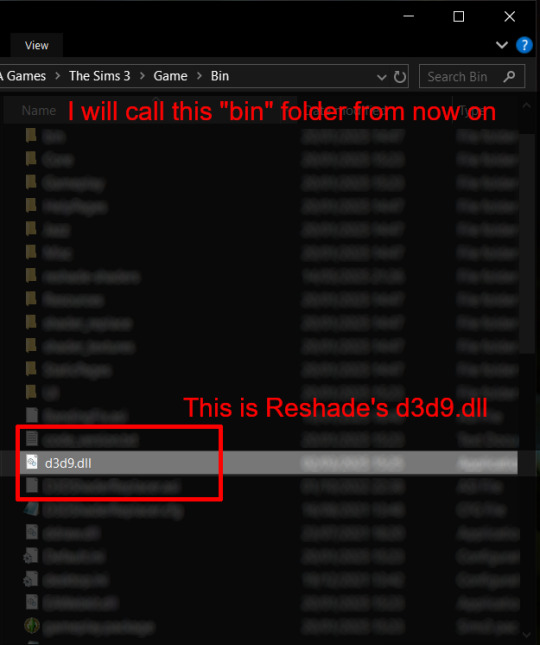
Perform a clean install of Reshade (I am using the latest version - 6.4.1 at the time of writing). Please note that you need a version no older than 4.5.0 or this method will not work. Choose DirectX9, click next.
Once the installation is complete, you should see a "d3d9.dll" file inside The Sims 3's bin folder (Program Files\EA Games\The Sims 3\Game\Bin):
It may all seem familiar thus far. Indeed, this is how we installed Reshade in the past before using DXVK, but here comes the tricky part:
Step 4:
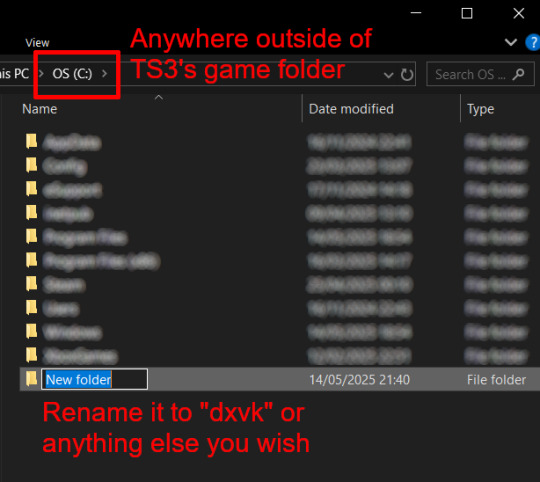
Create a new folder outside of The Sims 3's game folder (I created it on my C drive), name it "dxvk" or whatever else you like. Remember where you saved this folder, we will return to it later.
Step 5:
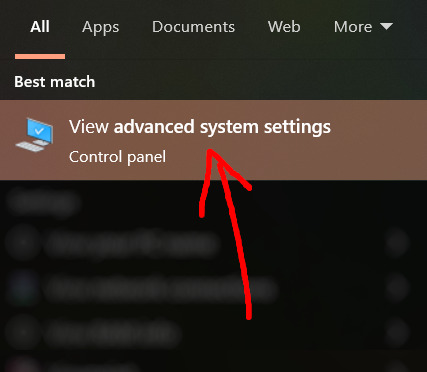
Now we need Reshade to load the next dll in order to chain Reshade with DXVK. Click on the search bar, and type in "View advanced system settings".
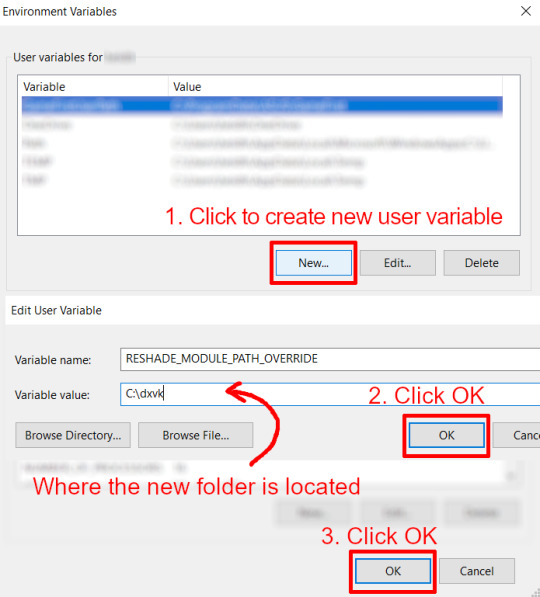
Click on "Environment Variables..."

Under "User variables", click "New..."
In the new pop-up window, find "Variable name:" and type in:
RESHADE_MODULE_PATH_OVERRIDE
for "Variable value:", paste in the directory that leads to the folder we created earlier. Once you are done, hit OK, and then hit OK again to save the changes made.
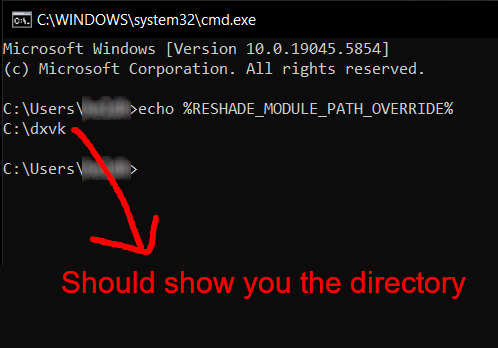
You can use Command Prompt to check if this new environment variable has been registered by entering:
echo %RESHADE_MODULE_PATH_OVERRIDE%
It should return you the folder's location. If not, make sure you have typed in the variable name correctly and confirm the folder's location.
Step 6:
Download DXVK (version 2.3.1) from here: https://github.com/doitsujin/DXVK/releases/tag/v2.3.1 and unzip "dxvk-2.3.1.tar.gz" (I use 7-Zip, but winRAR works, too). Remember to choose x32, and move only "d3d9.dll" to the folder we made earlier.
Now we have two "d3d9.dll" files, one from Reshade (lives in the bin folder), and the other from DXVK (in this new folder, outside of The Sims 3 game folder).

Step 7:
Download "dxvk.conf" here: https://github.com/doitsujin/dxvk/blob/master/dxvk.conf delete everything inside, and enter the following:
d3d9.textureMemory = 1 d3d9.presentInterval = 1 d3d9.maxFrameRate = 60 dxvk.hud = devinfo
Ctrl + S to save the document.
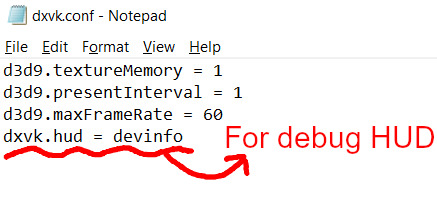
The first 3 lines are taken from @nornities and @desiree-uk's guide.
The last line is only for debugging purposes. Due to the inconvenient location occupied by the HUD (top left corner of your screen), it should be removed once the installation is successful.
Step 8:
Drag "dxvk.conf" into the bin folder, where Reshade's "d3d9.dll", "TS3.exe", and "TS3W.exe" all live.

Step 9:
Now fire up the game and check if both are showing up:

Lastly, check for “TS3.dxvk-cache” in the bin folder:
If it is there, congratulations! You have successfully installed DXVK and Reshade utilising D3D9 as API! You can now go to "dxvk.conf" and remove its last line "dxvk.hud = devinfo" and have fun! :)
Hope this tutorial isn't too confusing, the last thing I want is to over-complicate things. If you still need some help, comment down below or send me a DM/ask, I'll try and troubleshoot with you to the best of my ability.
Credits:
@nornities and @desiree-uk for their fantastic guide.
@criisolate for promulgating the usage of DXVK in TS3 community.
reddit user folieadeuxmeharder for helping me troubleshoot and informing me of this workaround.
doitsujin for creating DXVK.
crosire for creating Reshade.
122 notes
·
View notes
Text

Hey! I'm Amanda | Not WCIF | 18+ (Sometimes NSFW)
Find me on YouTube: Here Main series on YouTube: The Aspiring Artist | Rotational Gameplay All posts related to The Aspiring Artist can be found here. Casual gameplay posts on my blog are separate from the storyline on YouTube. All of my Sims 4 posts | All of my reblogs | Other nsfw posts CAS Mods Cas background | Cas lighting (Studio flat) | Controlled Position Mod | More Cas Columns (6 columns) Game Lighting Mods In-Game Lighting (Dark) | Sunblind Gshade/Reshade I make my own Gshade presets. They are not available for download. However, here are some that I would recommend if you are looking for a preset: Boho dreams (Neecxle) | Birdie (Sforzinda) | Lithium (Gunthermunch) | Luminescent (HazelMine) | Raices (Folkbreeze) | Almond (Glimersims) | Kaleidoscope (Okruee) | White Willow (Tianaberrie) | Serenity (Misslollypopsims) | Neapolitan (Midsummermoon) Photo Resources I use SRWE for a lot of my screenshots. I take some of them on a higher resolution monitor without hotsampling. I use Krita for photo editing and sometimes Canva. I usually crop my photos and resize them for faster uploading. Check out this tutorial if you're new to hotsampling. Check out this FAQ for help with understanding reshade. Video Resources I use OBS to record my videos and Filmora to edit. I also recommend Davinci for a free editing alternative. I use this mic for narrated episodes. Essential Gameplay Mods I don't use a lot of mods because I strongly dislike updating them. But these are the ones that I consider essential for my game: Basemental Drugs (21+) | Wicked Whims (18+) | MCCC I do have other gameplay mods installed, but I don't consider most of them to be necessities. MCCC and WW handle nearly all of the background "tuning" in my game. Other Mods The other mods I have installed: UI Cheats Extension | RPO (I only use modules 1, 7, and 14) | Somnik and Severinka Custom Foods | Control Any Sim | No Zzz | No Music Notes | Hidden Highlight | Tool | No Romantic Satisfaction Decay | Seasons Tuner | Kiss and Grind Defaults/Overrides My current default skin can be found here , default eyes here, default feet here, and default teeth here. I mostly use these skintones. Default phone | Default phone two | Default phone three | Toothbrush | Headphones | Male animation replacer (18+) | Terrain override I don't use custom loading screens, menu/map overrides etc. Some Commonly Used CC I use a lot of eyes from these creators found here and here. I typically use skins, skin details, and other genetics from these creators found here, here, and here.
146 notes
·
View notes
Note
Hey! Hope you're having a lovely day! I was wondering if you could share how you take your in-game pictures? (or maybe if you have some tips on how to...) They always look really good!
Hey! Thank you! Hope you too :3
I think I could share some basis 🤔
1) Ultra settings only!
2) SRWE – is your best friend if you want to take high quality screenshots. Without it in-game screenshots are pretty blurry on the distance 😔
Here is the YouTube tutorial.
3) HQ mod? You don’t actually need it, SRWE and ultra settings are enough (especially for maxis match and maxis mix style).
4) You totally need to check out better in-game lighting mod by northernsiberiawinds! It’s really awesome! Escpecially for outdoor screenshots 🌻
5) ReShade and GShade are your friends too! I regret I ignored it before 😅 For now I'm using GShade.
Here is the YouTube tutorial.
6) For making outdoors screenshots I normally put my sims in the shadow areas. The lighting there is less bright and more smooth. I add shadows in the scene by just putting random tree with tool by tmex.

7) For in-door screenshots I highly recommend to use the achino lamps (only recently discovered that they are free now). They also make lighting much smoother and cooler.
srwe + ghade + achino lamps (click picture for better quality)
no srwe + no gshade / srwe + gshade (click pictures to feel the difference)

8) And don't hesitate to use diffents shadows, reflections for your sims to avoid adding them in photoshop or any editing program you use.
Here is some links: 1 | 2 | 3 | 4 | 5 | 6
Hope it helps 🤗
143 notes
·
View notes
Text
INSTALLING// GShade + ReLight for The Sims 4
I've been getting a lotta asks about how I got the up to date GShade working with ReLight ( ALPHA ), so here's a mostly quick tutorial, that will hopefully get it working properly for you too!
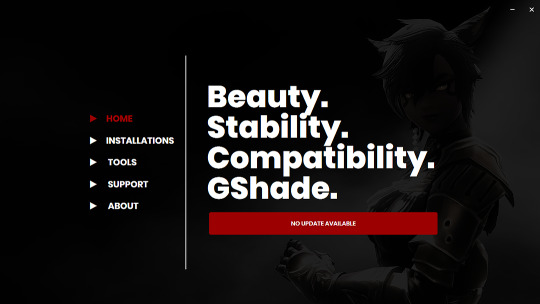
Firstly, download and install GShade, unless you've already got it installed, then just be sure it's up to date.
Click, or right click pics below and open in a new window to see them in more detail.
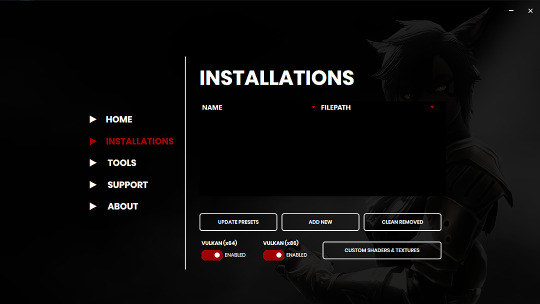
Now I don't currently have it installed into any of my games, bc I mainly use Reshade 2, so if you need to know how to do that, you're in luck! I'll walk you through it.
Click Add New.
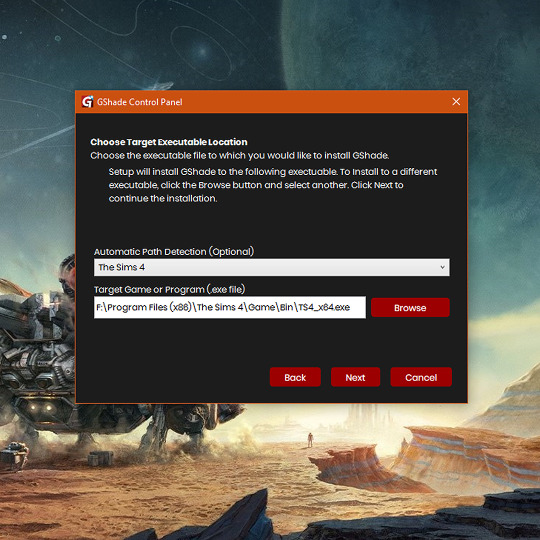
Then locate your TS4_x64.exe, except if you're fully updated, in which you'll need to locate your TS4_DX9_x64.exe, but only if you plan to opt out of using DX11, then click Next.
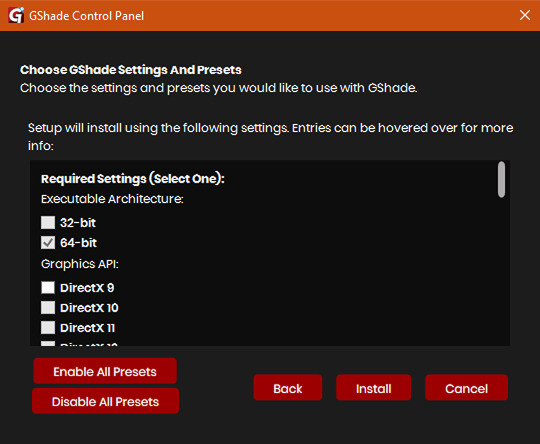
This will open another window with a bunch of ticked boxes, and tbh I didn't mess with any of these. Many them are greyed out anyway, and it all works fine for me.
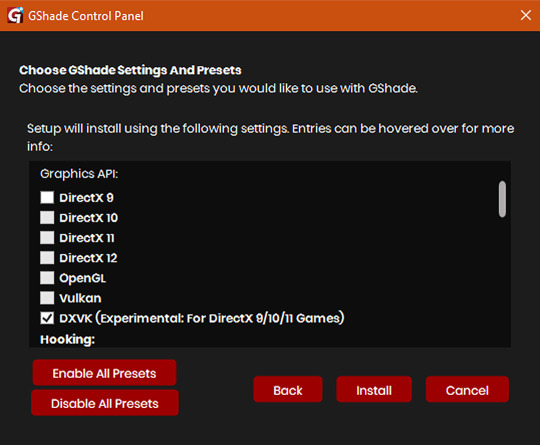
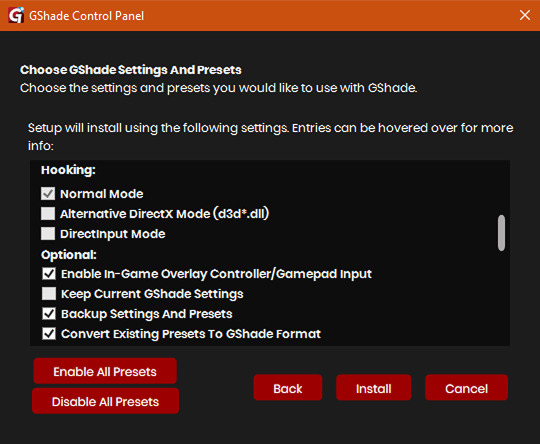
So if yours look like this, then you should be fine too.
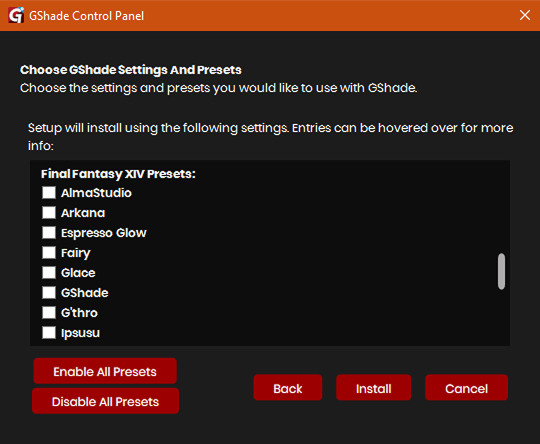
Lastly, at the bottom you can preload some presets if you like, but it's purely up to you. They aren't required.
When done, click Install.
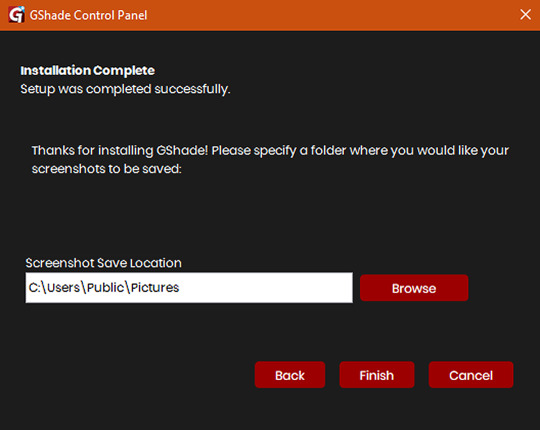
There will be another window that asks you where you'd like to save your pictures. Once again, this is purely up to you, click Browse to locate your preferred folder, or if you use programs like Nvidia for screenshots, just ignore it, and click Finish. Then when it asks if you're okay with the chosen location, click Yes.
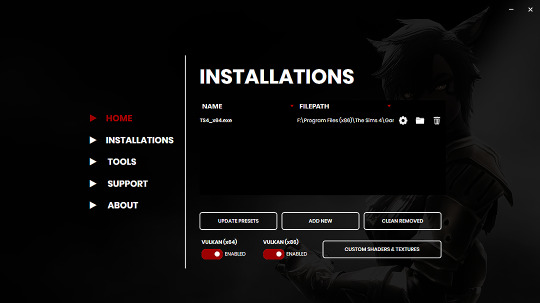
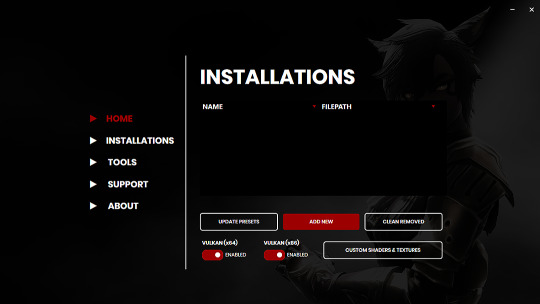
Once you've finished, TS4_x64.exe should show up in the Installations tab of your GShade installer, which means you're part way there! Now, click on the Custom Shaders & Textures button at the bottom, this will open the folder where you need to install ReLight.
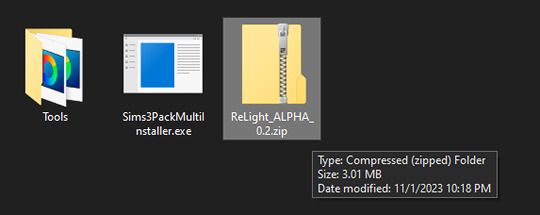
Locate your ReLight_ALPHA_0.2 download. Mine was in my Downloads folder. Double click it, or unzip it, and you'll find a couple folders inside it.
Click or right click pics below and open in a new tab for more detail.
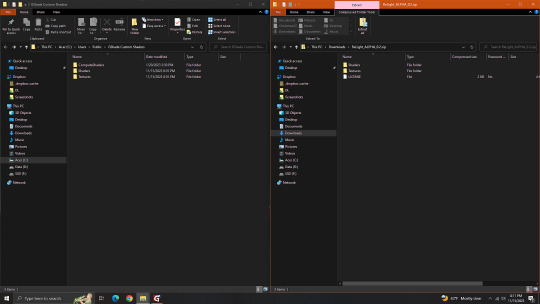
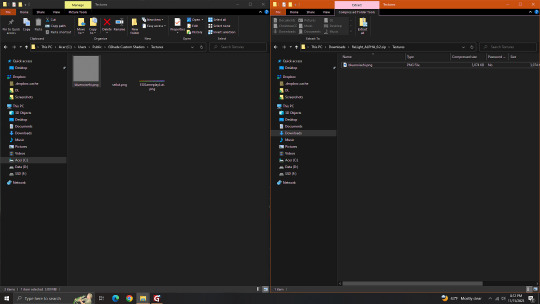
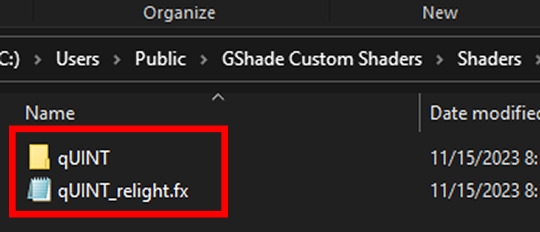
Here's a side by side comparison of the GShade Custom Shaders folder we just opened, and the ReLight_ALPHA_0.2 folder we unzipped and opened, so you can see how there are two identically named folders. The goal is to put whatever is in the Shaders folder of the ReLight folder, into the Shaders folder of the Custom Shaders folder, and then repeat this process again for both Textures folders, until they end up looking like this...
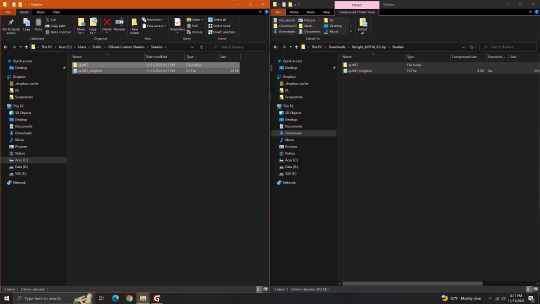
In conclusion, your GShade Custom Shaders > SHADERS folder should have these two files in it...
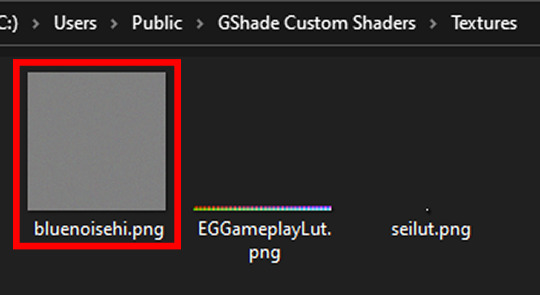
While your GShade Custom Shaders > TEXTURES folder should have this .png in it...
Good? Now let's turn on The Sims 4.
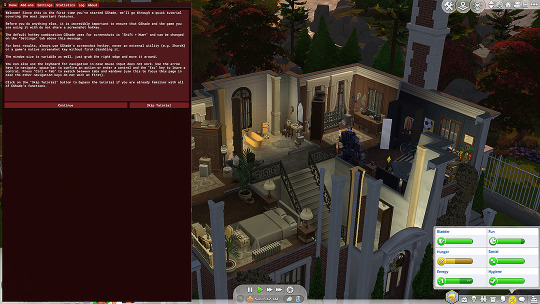
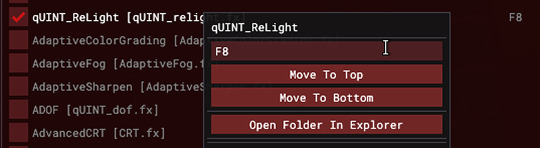
When you've opened you game, load your save ( idkw, but the GShade UI won't open in the menu screen ), then hit Shift + Backspace on your keyboard to open up the GShade UI. You can choose to go through the tutorial, or skip it. Either way just keep clicking continue or OK until you get to the Home panel. Now, I've got a preset already, if you've got one too, good, activate it, if you don't there should be like a default one you can use until you create one or get one. Main goal at this moment is to find ReLight in the list of shaders, and activate it so we know it works. Tick the Performance Mode box at the bottom, and scroll down 'til you find this...

This list should be alphabetized so just scroll down to the Q's, then tick the box beside it. Then click Active to Top, and scroll back to it. One thing I would suggest is binding it to a key ( right click while hovering over it ), this will make it easier to find if you lose it again, since clicking Active to Top also recalls any shaders that are bound, even if their box isn't ticked ( isn't active ).

I've bound mine to F8, but it's up to you what you wanna use, I only suggest it be F6 or above, since The Sims 4 already uses F1-F5 I believe.
Oh, and whenever you're done messing around with it, be sure to untick Performance Mode, so your computer won't beat your ass.
535 notes
·
View notes
Text

Everything You Need to Create the Perfect Screenshot/ Machinima Scene | The Sims 4
Gshade
How to Install Gshade
Relight Tutorial by JaieMichelle
Even Better In Game Lighting by Northern Siberia Winds
Wicked Whims
Wonderful Whims
Vanity Girl Phone Mod by Kikovanity
Control Any Sim
MC Command Center
Poses Mentioned
Mirror Ready by BBYGRL
Forever by PynkPunks
40 notes
·
View notes
Text
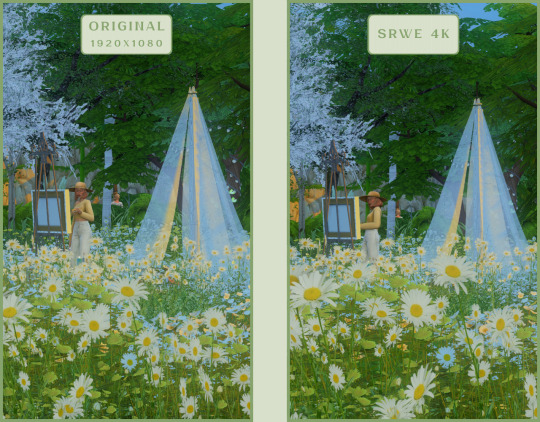
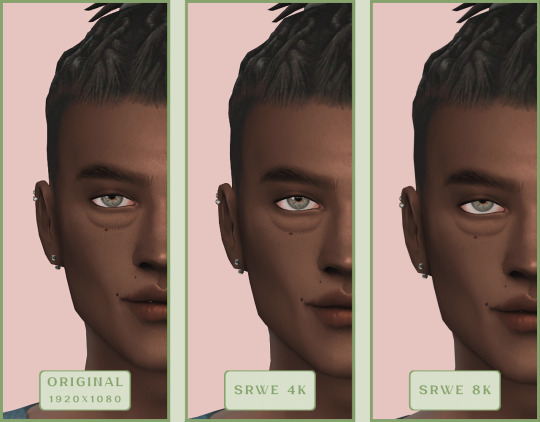
SRWE or AI? Best Ways to Upscale Sims 4 Screenshots
Are you also tired of seeing social media mercilessly crush your The Sims 4 screenshots? We’ve tried every trick in the book to keep our pics crisp – SRWE, AI upscalers, you name it – and now we’re ready to break down how to save your favorite sim’s photos from pixelation, quick and easy. In this article, we’ll explain (no tech jargon, promise!) what actually works, plus share our hands-on experience and top tips.
Your upscaling method depends heavily on the source image and the look you’re going for. We all have different ideas of what makes a sims beautiful – some love natural textures, even slight skin imperfections, while others prefer flawlessly smooth, hyper-sharp results.
We’ve tested different upscaling tools to help boost your screenshot quality. But to find your perfect match – the one that makes your shots look just right (by your standards!) – we recommend trying a few yourself.
You can enhance screenshots both before and after saving them! We’ve covered both approaches, so pick whichever suits you best.
Before Saving the Screenshot: SRWE (Simple Runtime Window Editor)
This tool is well-known in The Sims 4 community – there are tons of YouTube tutorials covering it. When it comes to improving image quality before taking a screenshot, SRWE is one of the first solutions that comes to mind.
It works by bypassing Windows' DPI scaling, allowing you to capture screenshots at a higher resolution without blurring.
Pros:
— A fantastic tool: it delivers the exact same image but in much better quality.
— No conflicts with GShade/ReShade: your presets will look exactly as intended.
— Free and easy to install, no hidden costs or complicated setup.
— No post-processing needed, preserves original texture and UI quality.
— No extra plugins or presets required, works right out of the box.
— Great performance even on low-end PCs. If your computer can run GShade, SRWE will work just fine.
Cons:
— Limited functionality.
— Some users find SRWE a bit tricky to set up (though we personally disagree).
Now, let’s break down how to use it and what results to expect.
If you prefer a video guide, check out this link for a detailed walkthrough by Chii.
Step 1
First things first – you'll need to download the program itself. It's available for free on GitHub – you can grab it here.
There's no real benefit to getting the version with pre-configured profiles, so just download the standard version without profiles.
Step 2
Extract the files from the archive.
It doesn’t matter where you store them on your computer – it won’t affect how the program works.
Step 3
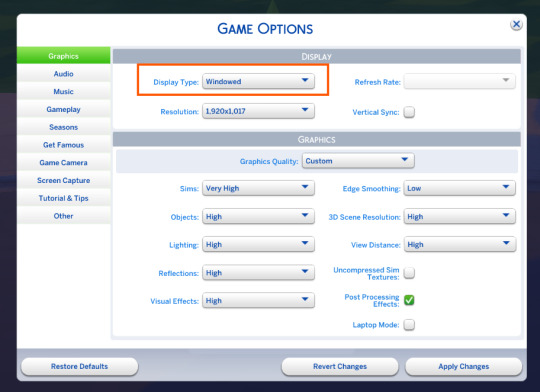
Now it’s time to launch the game and switch from fullscreen to windowed mode in the settings. You can also do this with the Alt+Enter shortcut.
Step 4
Set up your shot exactly how you want it. Open the location, pose your sims, apply any presets if needed. At this point, you can take a regular screenshot (for comparison) using your usual method.
Step 5
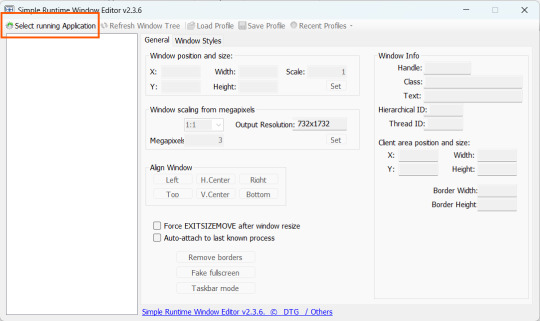
1. Go back to the SRWE folder.
There are only two files inside – one of them launches the program (no installation needed).

2. In the window that opens, select The Sims 4 from the list.
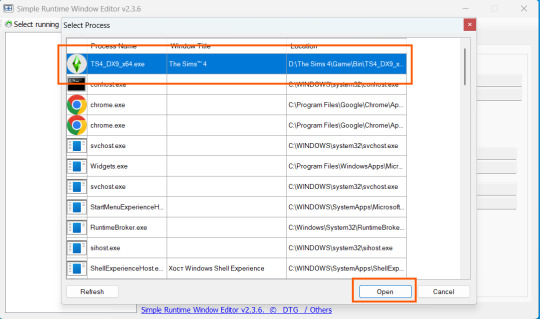
3. Check all the boxes.
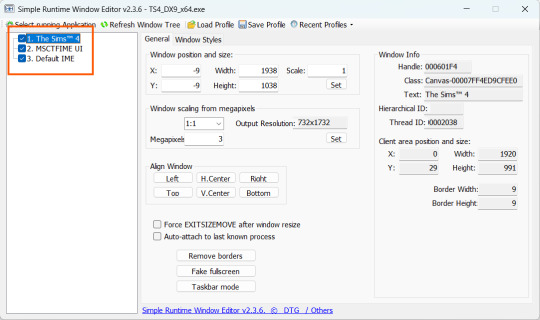
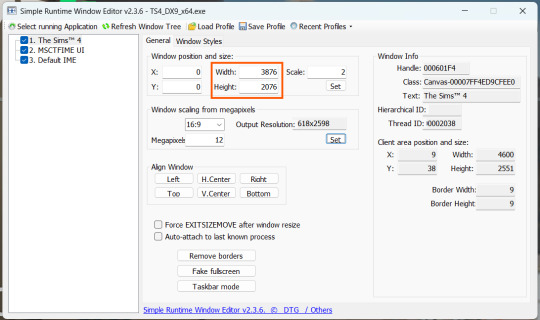
4. Image Size
You can set your screenshot size in a few different ways:
— The easiest method: Multiply your current resolution by the desired factor. For example, to upscale 1080p to 4K, multiply by 2. Tap Set.
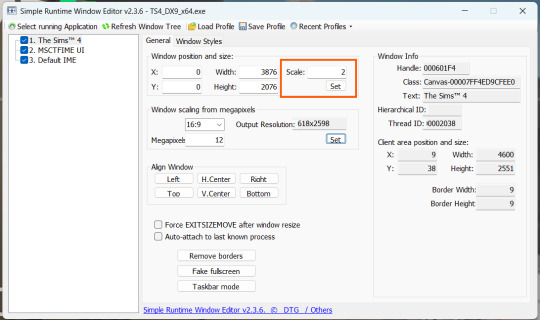
— Manual input: Enter your preferred pixel dimensions. Tap Set.
— Aspect ratio mode: Choose a format (1:1, 16:9, 4:3, etc.) and set your target megapixels. The program will automatically calculate the dimensions. Tap Set.
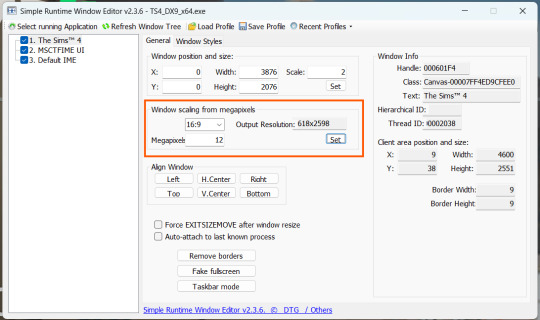
Honestly, you can experiment with any size. During our tests, even a weak PC handled an 8K screenshot without issues – though realistically, 4K is more than enough for most purposes.
Plus, if you're capturing in-game scenes (not just CAS), your screenshots will already be pretty large in file size. You probably won’t want them taking up even more space unnecessarily.
Step 6
Now when you return to the game, you'll notice the image has become significantly larger and no longer fits your screen resolution – you're only seeing a part of it.
Don't panic! Just wait for your preset to fully load (if you're using one), then take your screenshot as you normally would.
Step 7
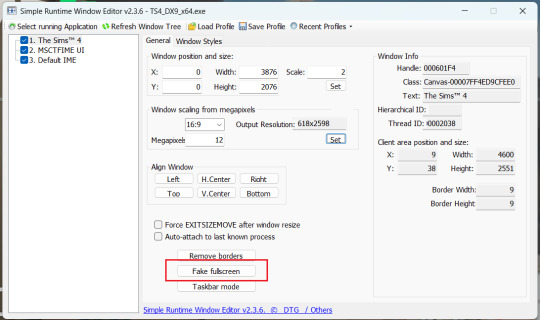
Once you've captured your planned screenshot, head back to SRWE and click "Fake Fullscreen" to return to the original resolution.
Now let's compare our results.
Gameplay Scenes
CAS
For in-game screenshots, this method works much better if you have at least a moderately powerful PC. After upscaling, navigation can become tricky due to lag. That said, it's still completely doable since we've prepared our scene in advance.
Post-Processing Screenshots
We've tested several post-processing programs: two paid options and several free ones.
Let's start with the paid options – Topaz Gigapixel AI and Let's Enhance.
Topaz Gigapixel AI
A specialized tool from Topaz Labs designed specifically for AI-powered image upscaling.
It doesn’t include extra features like noise reduction or face correction, but it delivers more precise upscaling, which is especially useful for The Sims 4 screenshots.
Pros:
— Upscale up to 600% (6x) without losing detail.
— Preserves texture clarity (hair, clothing, patterns).
— Automatically restores lost details (e.g., small decor items).
— Supports batch processing (multiple screenshots at once).
Cons:
— $99 price tag.
— Requires a powerful PC for 4K upscaling.
— Limited functionality (just upscaling, no additional edits).
— Trial version doesn’t allow exports.
Example:

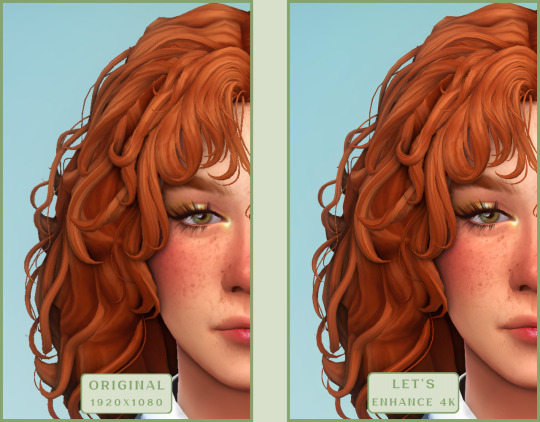
Let's Enhance
A convenient online AI-powered tool for enhancing screenshots. No downloads required – just head to https://letsenhance.io/boost and you're good to go.
Pros:
— Automatic upscaling up to 16K, boosts resolution without losing detail (hair and clothing textures become sharper).
— Dead simple to use: just upload your screenshot, pick a model, and download the result.
— AI doesn't just upscale, it subtly "beautifies" images too (though this is subjective, of course).
Cons:
— Free version limits you to 10 images/month (watermarked downloads; subscription starts at $9/month).
— Internet connection required (no offline mode).
We found these settings work best for Sims screenshots:
Now, let's see the results:
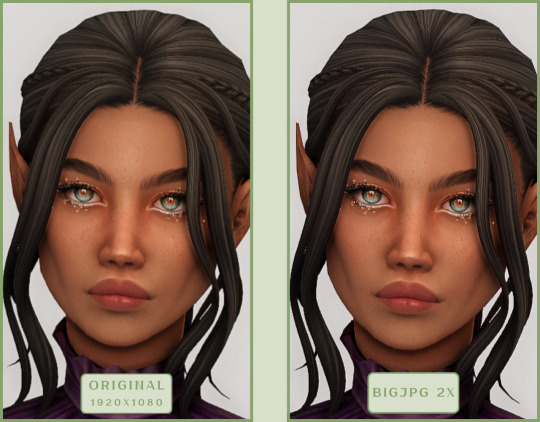
Free Upscaling Tools: Upscayl (with detailed usage guide), Bigjpg, and Waifu2x.
Bigjpg
A handy tool for basic image upscaling tasks, though the free version has limitations on processing speed and number of images.
Pros:
— Solid baseline results: boosts resolution effectively, making images noticeably sharper with genuine quality improvement.
— Free 2x/4x upscaling with watermark-free downloads.
Cons:
— Free version restricts image quantity, size, and processing speed.
— Lacks advanced parameter fine-tuning.
Our recommended settings combo:

The 4x upscale delivers noticeably weaker results.
Sample Bigjpg output:
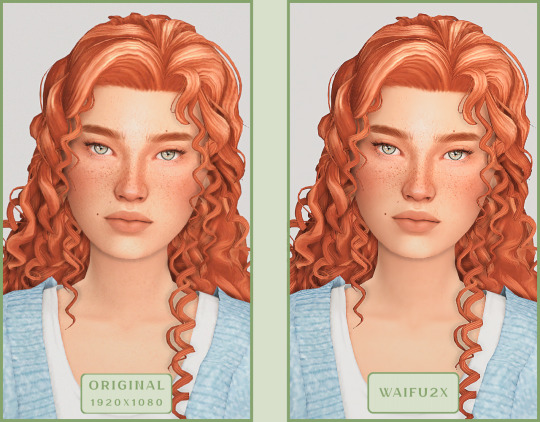
Waifu2x
A free neural network-based tool. Originally created for upscaling anime images, but works perfectly for The Sims 4 as well.
Pros:
— Upscales images 1.5x–2x without noticeable distortion.
— Preserves art style, doesn't turn pixel art into a "blurry mess" (unlike some other upscalers).
— Available in both online and offline versions.
— Offline version supports batch processing of screenshots.
— Free 2x upscaling with no watermarks.
— No powerful PC required.
Cons:
— Free online version has a 5MB file size limit.
— Maximum 2x scale (no higher options).
— Lacks advanced parameter tuning.
Our recommended settings:
Waifu2x results:
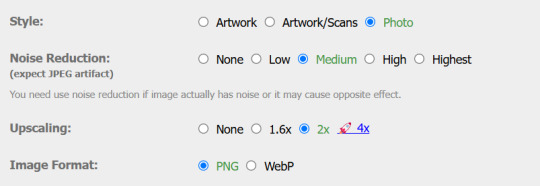
Upscayl
A free, open-source program that uses neural networks to upscale images without quality loss.
Pros:
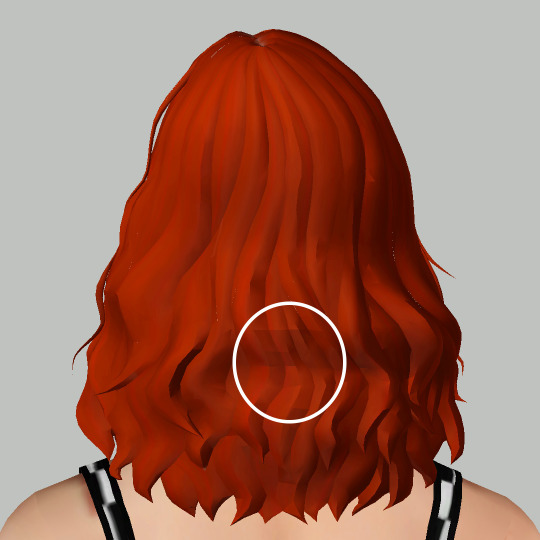
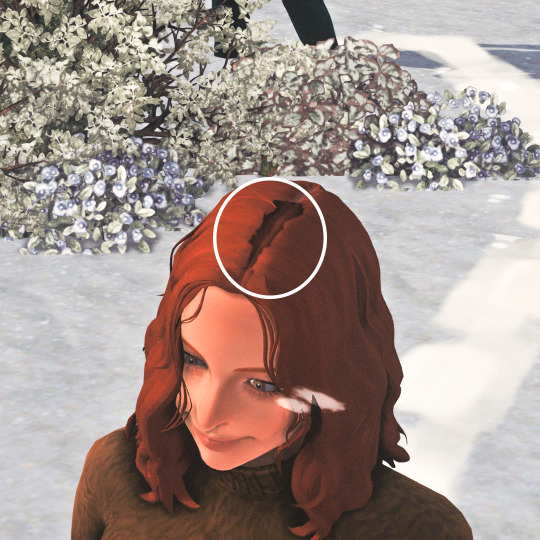
— Upscales images without distortion.
— Enhances fine details.
— Supports multiple AI models for different screenshot styles.
— Offline version handles batch processing.
— Free 4x upscaling with no watermarks.
— Doesn't require a powerful PC for 2x upscaling.
— Works offline, no internet needed after installation.
Cons:
— Requires a powerful PC for 4x upscaling.
— Minimalist interface – fewer beginner-friendly guides.
— Lacks advanced parameter tuning.
Given Upscayl's minimalist interface and lack of detailed tutorials, we decided to provide a more thorough walkthrough.
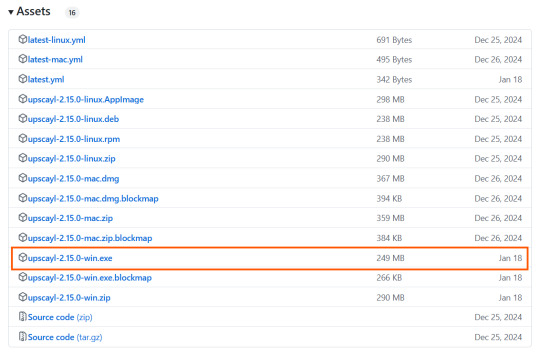
Step 1
First, download the program from its GitHub page. It's completely free and open-source.
Multiple versions are available – choose the one matching your system. For standard Windows, download the file highlighted in the screenshot below.
Step 2
Run the installer as administrator.
Install location doesn't matter – it won't affect performance. Select the destination folder. Click "Install".
Step 3
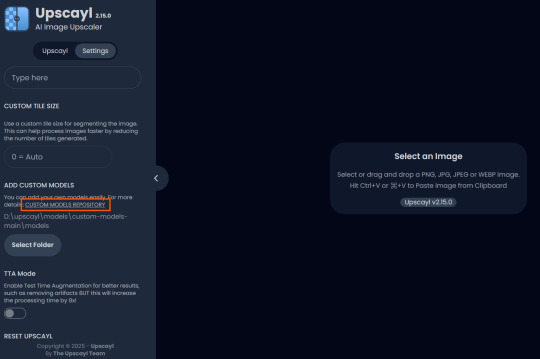
Upscayl includes several built-in AI models (good for testing), but we strongly recommend downloading custom models for better results:
1. Download the custom models pack here (also accessible via Settings → Add Custom Models in-app).
2. Extract the archive.
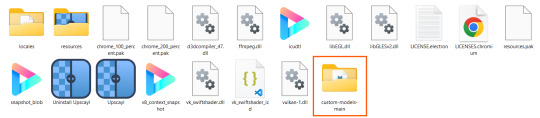
3. Navigate to custom-models-main → custom-models-main.
Move this folder to your Upscayl installation directory (optional: rename it).
Your Upscayl folder should now look like this:
4. Add Custom Models:
— Launch Upscayl.
— Go to Settings and click Select Folder.
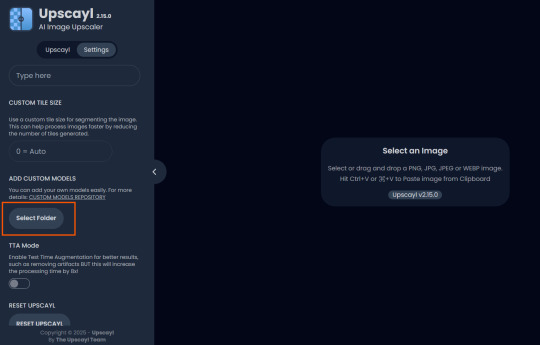
— Navigate to Upscayl → custom-models-main → models
Critical: The folder must be named "models" – don't rename it.
Step 4
Now that you have both the default and custom models loaded, it's time to start enhancing your screenshots.
1. Click Select Image or simply drag and drop your file into the processing area.
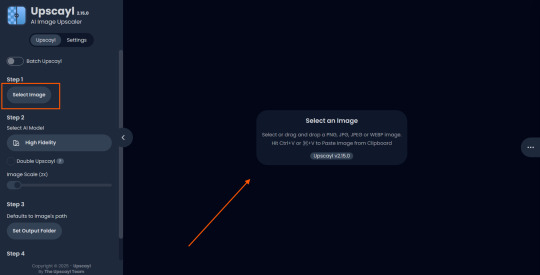
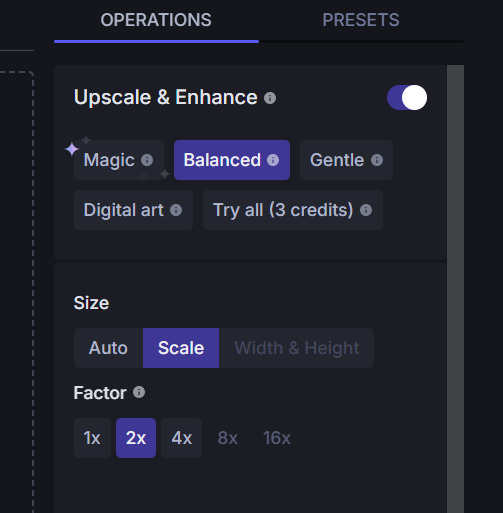
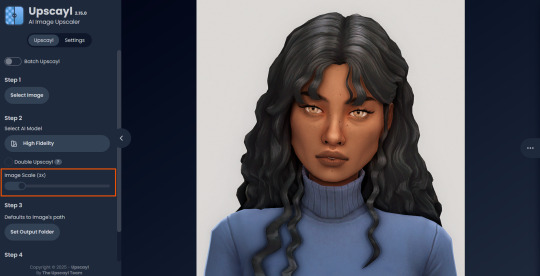
2. Choose Upscale Factor.
While Upscayl supports up to 16x magnification, it warns that anything above 5x may severely strain your system.
For optimal results, stick with 2x to 4x.
3. Select AI Model.
Click the Select AI Model dropdown: default models show before/after previews, custom models appear as a text list.
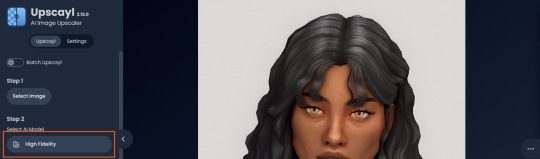
4. Experiment! Try different models on the same screenshot. Test various scales (2x, 3x, 4x) – sometimes better results come from modest scaling, while 4x might degrade quality.
For this demo, we'll use the first default model.
5. Click to begin enhancement.
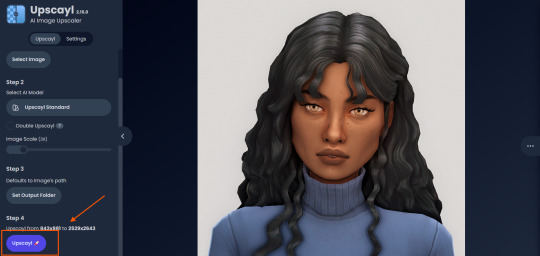
6. Processing time duration depends on original image quality, selected parameters and your PC's power (may complete quickly or take several minutes).
After processing, you'll see a clear side-by-side comparison of the changes.
7. Click the three-dot menu (⋮) for advanced viewing options.
Magnifying lens compares original vs. enhanced versions side-by-side.
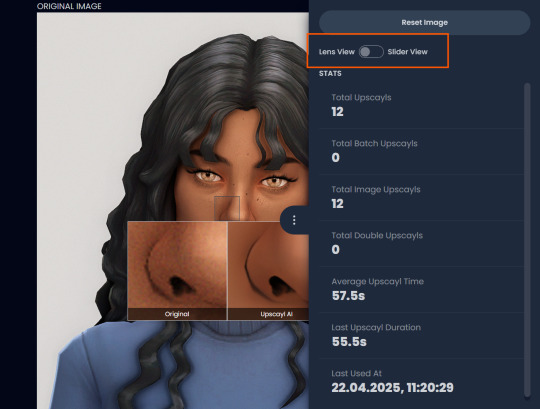
Also you may reset to original and revert all changes instantly.
8. Save your image.
By default, Upscayl saves to the source image's folder. To change this click Set Output Folder.

9. After this, use the Ctrl+S keyboard shortcut, and the new image will be saved. The original filename will be appended with the name of the AI model used and the upscaling scale applied.
You can also use batch processing. Before loading images, you simply need to enable batch loading.
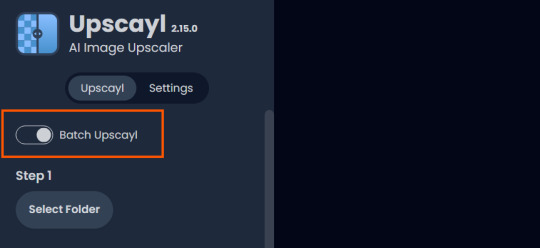
In the settings, there are different format options for saving processed images: PNG, JPG, WEBP. To preserve the best quality, we recommend choosing PNG.
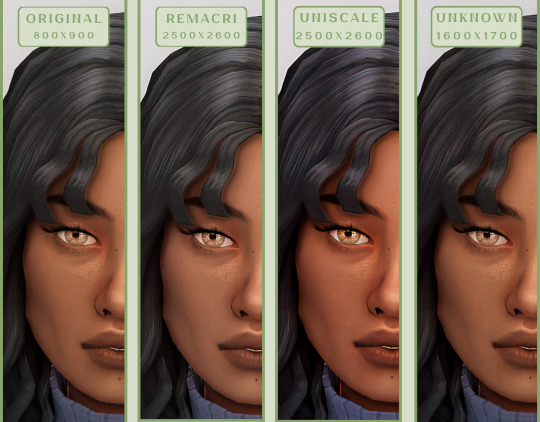
Finally, we're sharing the AI model options we liked best for processing Sims screenshots:
— Remacri (default model)
— Uniscale Restore (custom model)
— Unknown-2.0.1 (custom model)
🌱 Create your family tree with TheSimsTree
❓ Support 🌸 Our Blog
#TheSimsTree#simslegacy#legacychallenge#sims4#sims2#sims3#simsfamily#simstree#sims#sims4legacy#sims4roleplay#sims4stories#sims4couple#thesims4#ts4#ts4cc#plumtreeapp#simsta#simstagram#sims proposal#sims ideas#inzoi
25 notes
·
View notes
Text

how to create Sims 4 San Myshuno billboard overrides
hello Simblr! I have posted yet another tutorial over on my YouTube channel, this one all about creating custom Sims 4 San Myshuno billboard overrides, using @rensimss tutorial as an outline. a BILLION thanks to her!


i'd highly recommend checking out RenSimss' tutorial here. if you are interested in watching a video version, you can check out my newest YouTube video here.
#EACreatorNetwork || if you do not have the Sims 4 City Living Expansion pack (necessary for this tutorial) and would like to support me as a creator, use my code "SOLITASIMS" at checkout on the EA App or the Sims 4 official site to support me as a creator. thank you for your love and support always!
here is a list of everything you need to create your very own San Myshuno billboards. have fun!
Packs.
Sims 4 City Living
Programs.
Sims 4 Studio
Canva (any editing software is fine)
GShade (optional).
Mods.
T.O.O.L (optional)
Teleport Any Sim
Pose Player (can be subbed for Wicked Whims)
Underworlds and Daybreak (optional).
Pose Packs (optional).
377 Pool Pose
Etc.
San Myshuno Billboard Textures
Simlish Fonts (optional, but highly recommended)
#solitasims#solitasims4#sims 4#the sims 4#thesims4#ts4 simblr#the sims#solita sims#sims 4 cc#sims 4 custom billboards#sims 4 billboard overrides#sims 4 billboard override#sims 4 san myshuno#sims 4 san myshuno billboard overrides#sims 4 overrides#how to make sims 4 overrides
94 notes
·
View notes
Text


4t3 Simandy Larsson Hair
Hi! I convert this sims 4 maxis match hair, because I want to keep my game smooth with cc hairs that have under 13k polycount. But alpha hairs' polycount is often between 20-40k. So here I am! Trying to convert some clay hairs~
Info
Original sims 4 post here by @simandy
Converted by me
Polycount: 12k (reduced from 14k by me)
The roots and the tips are not recolorable, but the main hair and the highlights are recolorable.
Pigtail problem fixed
Credits:
@simandy for mesh, texture and the generous TOU, @nightospheresims, @gruesim and @maryjanesims3 for their wonderful tutorials, Anubis360 for control base.
DOWNLOAD
Simfileshare / Patreon (free)
NOTES seen below
1. There are some scratches in the sims 4 mesh, brought to sims 3 as well because I don't know how to fix it. It seems hard to be noticed in sims 4 game, but sadly can be seen in sims 3.
2. The top of the head might not look good with Mxao effect on in Reshade / GShade, so better to turn Mxao off.
BONUS:
That Don was making snow angel besides us, when I tried to make screenshots for preview. Scroll down to see his innocent, happy face (yes, this is the bonus).

99 notes
·
View notes
Text

₊ 𖦹﹕shinobi bloom - a sims 4 gshade preset !! (🐰)
hey everyone !!!
i finally took the plunge and explored the gshade panel, and i ended up creating a brand new preset that fits my current save perfectly !! this is actually my very first gshade preset, and i'm honestly so happy with how it turned out !! the color palette really highlights the sakura trees beautifully, and i can't wait to share it with you all !! <3 see more previews below !!! :p
also ! if you're curious about what lot this is.. i'm currently transforming new crest into a shibuya-equivalent world, but of course not too similar :pp just the same vibes !!
꒷꒦︶꒷꒦︶ ๋ ࣭ ⭑꒷꒦


꒷꒦︶꒷꒦︶ ๋ ࣭ ⭑꒷꒦
˶ᵔ ᵕ ᵔ˶ IMPORTANT DETAILS .ᐟ.ᐟ ── .✦
note that this is GSHADE preset, not ReShade !! so if you'd like this preset, you've got to have gshade installed to your exe file !! :pp if you need a tutorial, check this one out : 𖦹 !!
turn on cinematic DOF by pressing ctrl + 5 on your keyboard !! :pp
please do not claim this as yours, or tweak it any way !! if you'd like to use my gshade preset as a base, let me know beforehand !! :D
꒷꒦︶꒷꒦︶ ๋ ࣭ ⭑꒷꒦
꒱ enjoy and let me know if there are any issues !! ... ೃ⁀➷ ・
⤷ dl : 𖦹
#sims 4#ts4#ts4 simblr#simblr#the sims 4#s4#thesims4#show us your builds#sims community#sims 4 interior#sims 4 gshade presets#gshade preset#ts4 gshade preset#ts4 gshade presets
20 notes
·
View notes
Text

The Sims 4 Graphics Mods You NEED in Your Game! by LargeTayterTots
Visual Mods No Blur In The Distance by mizoreyukii Cinematic Live Mode Camera by simmatically Improved Phone Camera by cubiertodeflores Enhanced Thumbnails by simplyanjuta Trait Based Sim Thumbnails by simplyanjuta
Lighting Mods Sunblind by softerhaze (Installation Tutorial) NoBlu V2 by luumia (I use the darker version) NoGlo by luumia Simple Glo CAS Lighting by vyxated Better In-Game Lighting by northern siberia winds
Add-On Programs Reshade - (Installation Tutorial) - My Reshade Preset GShade - (Installation Tutorial) Reshade/Gshade Preset Recommendations Relight (Installation Tutorial)
youtube / tiktok / twitch / patreon / gallery id: largetaytertots
601 notes
·
View notes